django form
Basic
Types of Form in Django
1. Form
Django Forms (django.forms.Form)
2. ModelForm
Model Forms (django.forms.ModelForm)
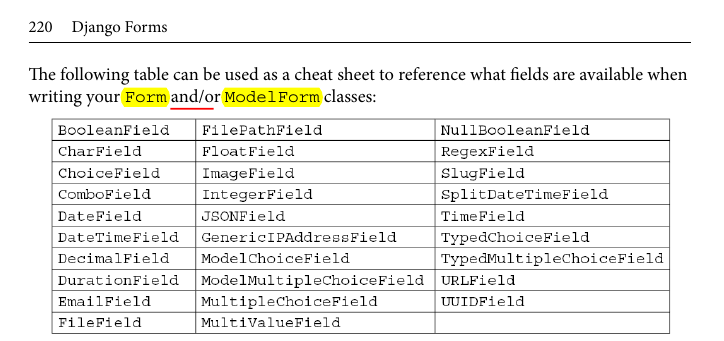
Django Forms library
The Django Forms library
The Django Forms library allows you to quickly define a form using a Python class. This is done by creating a subclass of the base Django Form class.
- We refer to our classes as forms, similar to how we subclass Django Models to create Model classes.
- Forms contain one or more fields of a certain type (such as text fields, number fields, or email fields).
- You’ll notice this sounds like Django Models, and forms are similar to Models but use different field classes.
from django import forms

class ExampleForm(forms.Form):
    text_input = forms.CharField()
    password_input =
    forms.CharField(widget=forms.PasswordInput)
Web Development with Django by Bharath Chandra K S - 2nd, 2023
Working with form views
A form view is just like any other view class, except that a form view class is designed to process and handle form objects and form submissions.
Django offers four main form view classes, listed here:
- FormView
- CreateView
- UpdateView
- DeleteView
These can all be found in the django.views.generic.edit library.
Advanced
Example
Website Contact Section
In your ContactFormView in form_valid() method, you're trying to call form.save(commit=False). But commit=False is used in model forms, not in regular forms.
Since you're using a regular form, you won't have this attribute available. Here's the corrected version:
# contact/views.py
from django.shortcuts import render, redirect
from django.views.generic import FormView, TemplateView
from .forms import ContactForm
from .models import ContactMessage

class ContactFormView(FormView):
    template_name = 'contacts/contact.html'
    form_class = ContactForm
    success_url = '/contact/success/'

    def form_valid(self, form):
        name = form.cleaned_data['name']
        email = form.cleaned_data['email']
        message = form.cleaned_data['message']

        # Create and save ContactMessage instance
        contact_message = ContactMessage.objects.create(name=name, email=email, message=message)

        return super().form_valid(form)

class ContactSuccessView(TemplateView):
    template_name = 'contact/contact_success.html'
# myproject/urls.py
from django.urls import path
from django.conf import settings
from django.conf.urls.static import static
from contact.views import ContactFormView, ContactSuccessView

urlpatterns = [
    path('contact/', ContactFormView.as_view(), name='contact'),
    path('contact/success/', ContactSuccessView.as_view(), name='contact_success'),
] + static(settings.MEDIA_URL, document_root=settings.MEDIA_ROOT)
Success
To implement the contact section in the Django admin dashboard, you need to register the ContactMessage model with the admin site.
Here's how you can do it:
from django.contrib import admin
from .models import ContactMessage

@admin.register(ContactMessage)
class ContactMessageAdmin(admin.ModelAdmin):
    list_display = ('name', 'email', 'message', 'timestamp')
    search_fields = ('name', 'email', 'message')
In this code:
- @admin.register(ContactMessage) is a decorator that registers the
ContactMessagemodel with the admin site. ContactMessageAdminis a class that inherits fromadmin.ModelAdmin, allowing you to customize the appearance and behavior of the model in the admin interface.list_displayspecifies which fields should be displayed in the list view of contact messages in the admin interface.search_fieldsspecifies the fields by which the contact messages can be searched in the admin interface.
With this setup, you can now access and manage contact form submissions in the Django admin dashboard. When you run your Django server and navigate to the admin site (/admin by default), you should see the Contact Messages section where you can view, search, and manage contact form submissions.
Other Topic
Registering a Model with the Django Admin Interface
Both admin.site.register(ContactMessage) and @admin.register(ContactMessage) are used to register a model with the Django admin interface, but they differ in syntax and usage style. Here's a breakdown of each:
1. admin.site.register(ContactMessage):
This method is the traditional way of registering models with the Django admin interface. It's used by directly accessing the site attribute of the admin module. This method is still perfectly valid and widely used, especially in older Django projects or when registering multiple models.
2. @admin.register(ContactMessage):
This method is a decorator-based approach introduced in Django 1.7. It provides a more convenient and readable way to register models with the admin interface. It's generally preferred for its clarity and brevity, especially for registering a single model.
- @admin.register(ModelName)
- @admin.display()
- @admin.action()
- @admin.fieldsets()
Both methods achieve the same result of registering the ContactMessage model with the admin interface. The choice between them often comes down to personal preference, team conventions, and the complexity of your project.
For simple cases, where you're just registering a model without any additional customization, the @admin.register() decorator provides a concise and clear syntax. However, if you have more complex customization needs or if you're registering multiple models, using admin.site.register() might be more appropriate.
To disable or hide the add button in admin dashboard
from django.contrib import admin
from .models import ContactMessage

class ContactMessageAdmin(admin.ModelAdmin):
    # Customize the admin interface for ContactMessage model
    def has_add_permission(self, request):
        # Disable the ability to add new contacts
        return False

# Register the ContactMessage model with the customized admin interface
admin.site.register(ContactMessage, ContactMessageAdmin)
This approach ensures that users cannot add new contacts via the admin interface while still allowing them to view and manage existing contact entries. Adjust the code as needed to fit your specific requirements and project structure.
{{ form.as_p }}
In Django templates, {{ form.as_p }} is a shortcut for rendering each form field as a paragraph (
element). Each form field label and input element pair will be wrapped in a
tag. This is a simple way to render a form in HTML.
If you want to use Bootstrap for styling your form, you can integrate Bootstrap classes directly into your template. Here's how you can modify your template to use Bootstrap classes for layout:
<div class="col-md-12">
    <h5>Contact</h5>
    <form method="post" class="form">
        {% csrf_token %}
        <div class="form-group">
            {{ form.name.label_tag }}
            {{ form.name }}
        </div>
        <div class="form-group">
            {{ form.email.label_tag }}
            {{ form.email }}
        </div>
        <div class="form-group">
            {{ form.message.label_tag }}
            {{ form.message }}
        </div>
        <button type="submit" class="btn btn-primary">Submit</button>
    </form>
</div>
In this modified template:
- Each form field is wrapped in a element with the class
form-group, which is a Bootstrap class used for styling form elements.- The form label (
{{ form.field.label_tag }}) and input element ({{ form.field }}) are placed within the same form-group div.- The submit button is styled using Bootstrap's
btnandbtn-primaryclasses to make it a Bootstrap-styled button.This layout adheres to Bootstrap's styling conventions and ensures that your form is styled consistently with the rest of your Bootstrap-based website. Adjust the classes and styling as needed to fit your specific design requirements.
<form method="post"> {% csrf_token %} <div class="mb-3"> {{ form.name.label_tag }} <input type="{{ form.name.field.widget.input_type }}" name="{{ form.name.html_name }}" id="{{ form.name.id_for_label }}" class="form-control"> </div> <div class="mb-3"> {{ form.email.label_tag }} <input type="{{ form.email.field.widget.input_type }}" name="{{ form.email.html_name }}" id="{{ form.email.id_for_label }}" class="form-control"> </div> <div class="mb-3"> {{ form.message.label_tag }} <textarea name="{{ form.message.html_name }}" id="{{ form.message.id_for_label }}" class="form-control"></textarea> </div> <button type="submit" class="btn btn-primary">Submit</button> </form> - The form label (
Danger
Q: Can't save a form in Django (object has no attribute 'save')
A:
save is available only for ModelForm by default, not for forms.Form
Example
from django.views.generic import TemplateView
from .forms import ContactForm

class ContactIndexView(TemplateView):
    template_name = 'index.html'

    def get_context_data(self, **kwargs):
        context = super().get_context_data(**kwargs)
        # Include an instance of your form in the context
        context['form'] = ContactForm()
        return context
from django.views.generic import TemplateView
from .forms import ContactForm

class ContactIndexView(TemplateView):
    template_name = 'index.html'
    # Add this line to reference the form class
    form_class = ContactForm

    def get_context_data(self, **kwargs):
        context = super().get_context_data(**kwargs)

        # Include an instance of your form in the context
        context['form'] = self.form_class()

        return context
TemplateView and FormView
TemplateView and FormView are both class-based views provided by Django, but they serve different purposes.
TemplateView:
- TemplateView is used when you want to display a template without any form processing involved.
- It's typically used for rendering static content or content that doesn't require any data processing or form submissions.
- It doesn't handle form submissions or provide methods for processing form data.
- You can use TemplateView to render templates and pass context data to the template, but it doesn't include any form handling logic.
FormView:
- FormView is used when you want to display a form, process submitted form data, and handle form validation.
- It's designed to handle form submissions, validate form data, and perform actions based on the form submission, such as saving data to a database.
- It provides built-in methods for handling form submission (
form_valid()andform_invalid()), which allow you to define custom logic for what happens when the form is submitted successfully or contains errors. - FormView typically works with Django forms (
django.forms.Formordjango.forms.ModelForm) and is suitable for scenarios where you need to handle form submissions and perform form validation.
In your case, if the form is displaying correctly with FormView but not with TemplateView, it suggests that there might be an issue with how you're setting up the TemplateView or how you're including the form in the template. Make sure that the ContactForm instance is correctly included in the context of the TemplateView and that the template is rendering the form properly. If the form is not displaying with TemplateView, it might indicate that the form instance is not being passed to the template context correctly or that there might be an issue with the template rendering logic.
Mixins
To display the ContactFormView form in both contacts/contact.html and index.html, you have a couple of options. One common approach is to reuse the same view class (ContactFormView) for both URLs, but specify different template names for each URL pattern. Here's how you can achieve this:
from django.urls import reverse_lazy
from django.views.generic import FormView
from .forms import ContactForm
from .models import ContactMessage

class ContactFormView(FormView):
    template_name = 'contacts/contact.html'
    form_class = ContactForm
    success_url = reverse_lazy('contact_success')

    def form_valid(self, form):
        name = form.cleaned_data['name']
        email = form.cleaned_data['email']
        message = form.cleaned_data['message']

        # Create and save ContactMessage instance
        contact_message = ContactMessage.objects.create(name=name, email=email, message=message)

        self.request.session.pop('form_data', None)

        return super().form_valid(form)
Another approach to displaying the same form in multiple templates while keeping your views DRY (Don't Repeat Yourself) is by using a mixin. Mixins allow you to share common functionality among different views.
from django.views.generic.edit import FormMixin
from .forms import ContactForm

from django.urls import reverse_lazy
from django.views.generic import TemplateView
from .models import ContactMessage

class ContactFormMixin(FormMixin):
    form_class = ContactForm
    success_url = reverse_lazy('contact_success')
    template_name = 'contacts/contact.html'

    def form_valid(self, form):
        name = form.cleaned_data['name']
        email = form.cleaned_data['email']
        message = form.cleaned_data['message']

        # Create and save ContactMessage instance
        contact_message = ContactMessage.objects.create(name=name, email=email, message=message)

        self.request.session.pop('form_data', None)

        return super().form_valid(form)

class ContactFormView(ContactFormMixin, FormView):
    pass

class ContactSuccessView(TemplateView):
    template_name = 'contacts/contact_success.html'

class IndexView(ContactFormMixin, TemplateView):
    template_name = 'index.html'
from django.urls import path
from .views import ContactFormView, ContactSuccessView, IndexView

urlpatterns = [
    path('', IndexView.as_view(), name='index'),
    path('contact/', ContactFormView.as_view(), name='contact'),
    path('contact/success/', ContactSuccessView.as_view(), name='contact_success'),
]
project vs apps guidelines
Defining URL patterns in Django involves organizing them in a structured manner, both at the project level and the app level. Here are some guidelines and best practices for managing project URLs and app URLs:
1. Use include() for App URLs: Use Django's include() function to include URLs from individual apps in your project's urls.py. This keeps the project URLs modular and allows you to organize them by functionality.
from django.urls import path, include

urlpatterns = [
    path('admin/', admin.site.urls),
    path('myapp/', include('myapp.urls')),
    # Other app URLs included here
]
2.Prefix App URLs: Prefix URLs for each app with a common path to avoid conflicts and provide clarity. For example, if you have an app for managing contacts, prefix its URLs with contacts/.
1. Use Namespaced URLs: Use namespaced URLs within your app to avoid conflicts with other apps. Define a unique app_name in your app's urls.py and use it to namespace your URLs.
app_name = 'myapp'

urlpatterns = [
    path('some-url/', views.some_view, name='some_view'),
    # Other URLs...
]
2. Group URLs by Functionality: Organize URLs within your app's urls.py based on their functionality or resource. For example, group all user-related URLs together, all product-related URLs together, etc.
3. Use Class-based Views: Prefer using class-based views over function-based views as they provide better code organization and reuse. Use as_view() to convert class-based views to callable views in your URL patterns.
General Tips:
-
Comments and Documentation: Add comments and documentation to your URLs to explain their purpose, especially if the project is complex or involves multiple developers.
-
Consistency: Maintain consistency in URL naming conventions, URL structure, and URL organization across your project. Consistency makes it easier to understand and navigate the codebase.
-
Avoid Hardcoding URLs: Use Django's
reverse()orreverse_lazy()functions to reverse-resolve URLs instead of hardcoding them. This makes your code more robust and easier to maintain if URLs change in the future. -
Keep URLs Concise and Descriptive: Use concise yet descriptive URLs that clearly convey the purpose of the resource or view being accessed.
By following these guidelines and best practices, you can effectively manage and organize your project URLs, making your codebase more maintainable and understandable.
What is Namespace URLS in django apps
Namespaced URLs in Django allow you to organize URLs within your app and avoid conflicts with URLs from other apps. Here's what it means and how to use it:
What are Namespaced URLs?
In Django, a namespace is a way to group a set of URL patterns under a common name. This is particularly useful when you have multiple apps in your project, each with its own set of URL patterns. By namespacing the URLs, you can ensure that URLs from different apps don't clash with each other. How to Use Namespaced URLs?
To use namespaced URLs, you need to follow these steps:
1. Define an app_name in urls.py: In your app's urls.py file, define an app_name variable to specify the namespace for the URLs in that app.
2. Specify Namespaced URLs: When defining URL patterns in your app's urls.py, use the app_name specified earlier as the namespace for the URLs.
from django.urls import path
from . import views

app_name = 'myapp'

urlpatterns = [
    path('some-url/', views.some_view, name='some_view'),
    # Other URLs...
]
3. Referencing Namespaced URLs: When referencing URLs in templates or views, use the {% url %} template tag or reverse() function, specifying the namespace along with the URL name.
- Using the
{% url %}template tag:
- Using the
reverse()function in views:
When to Use Namespaced URLs?
Namespaced URLs are particularly useful when:
- You have multiple apps in your Django project.
- Your project structure involves reusable apps that can be used in different projects.
- You want to organize URLs within each app and avoid conflicts between URL names.
Namespaced URLs help keep your codebase organized, maintainable, and less error-prone, especially in larger projects with multiple apps. They also provide a clear and concise way to reference URLs within templates and views.
Warning
from django.shortcuts import redirect

class IndexView(TemplateView):
    template_name = 'index.html'

    def get_context_data(self, **kwargs):
        context = super().get_context_data(**kwargs)
        context['form'] = ContactForm()
        return context

    def post(self, request, *args, **kwargs):
        form = ContactForm(request.POST)
        if form.is_valid():
            name = form.cleaned_data['name']
            email = form.cleaned_data['email']
            message = form.cleaned_data['message']
            contact_message = ContactMessage.objects.create(name=name, email=email, message=message)
            # Redirect to contact success URL
            return redirect('contact_success')
        return render(request, self.template_name, {'form': form})
Bugs
In the ContactIndexView, context['form'] = ContactForm() and context['contact_messages'] = ContactMessage.objects.all() are two separate lines that serve different purposes:
-
context['form'] = ContactForm(): This line creates an instance of the ContactForm class and assigns it to the key
formin the context dictionary. This form instance will be used in the template to render the contact form. -
context['contact_messages'] = ContactMessage.objects.all(): This line fetches all instances of the ContactMessage model using
ContactMessage.objects.all()and assigns them to the keycontact_messagesin the context dictionary. These contact messages will be used in the template to display the existing messages.
In summary:
context['form'] is used to pass a form instance to the template for rendering the form.
context['contact_messages'] is used to pass a queryset of ContactMessage instances to the template for displaying existing messages.
Both are important for rendering the complete view in the template: the form for users to submit new messages and the existing messages for users to view.
Danger
Whether to use the model or the form in the context depends on what you want to achieve in your view and template.
Here's a breakdown:
1. Model (ContactMessage.objects.all()):
- If you want to display existing contact messages in your template, you would typically use the model queryset (ContactMessage.objects.all()). This allows you to access all instances of the
ContactMessage modelfrom your database. - You would use the model queryset to iterate over existing messages and display them in your template.
2.Form (ContactForm()):
- If you want to include a form in your template for users to submit new contact messages, you would use the form instance (
ContactForm()). - You would use the form instance to render the form fields in your template and handle user input (
submission) when the form is submitted.
In most cases, you would want to include both the model queryset and the form in your context:
- Use the model queryset to display existing messages.
- Use the form instance to render the form for users to submit new messages.
This allows your template to provide both functionalities: displaying existing messages and enabling users to submit new messages.
Here's how you might include both in your view:
class ContactIndexView(TemplateView):
template_name = 'index.html'

def get_context_data(self, **kwargs):
    context = super().get_context_data(**kwargs)
    context['form'] = ContactForm()  # Form for user submission
    context['contact_messages'] = ContactMessage.objects.all()  # Existing messages
    return context
And in your template, you would use {{ form }} to render the form fields and iterate over {{ contact_messages }} to display existing messages.