Django really is the framework for perfectionists with deadlines.
Django is an opinionated, full-stack web application framework. It comes with many batteries that you can use to build a fully functional web application, including static and media file management.
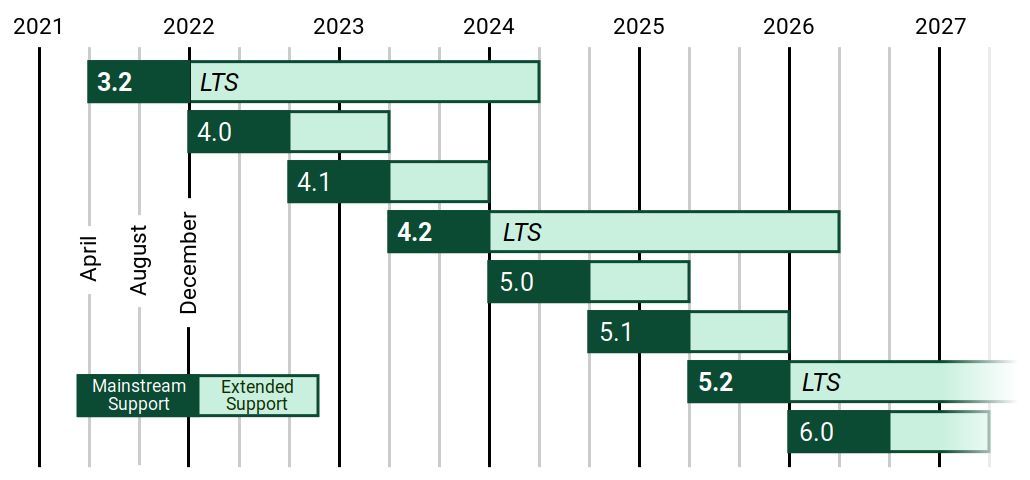
What Python version can I use with Django?
| Django version | Python versions |
|---|---|
3.2 |
3.6, 3.7, 3.8, 3.9, 3.10 (added in 3.2.9) |
4.0 |
3.8, 3.9, 3.10 |
4.1 |
3.8, 3.9, 3.10, 3.11 (added in 4.1.3) |
4.2 |
3.8, 3.9, 3.10, 3.11, 3.12 (added in 4.2.8) |
5.0 |
3.10, 3.11, 3.12 |
For each version of Python, only the latest micro release (A.B.C) is officially supported. You can find the latest micro version for each series on the Python download page.
Typically, we will support a Python version up to and including the first Django LTS release whose security support ends after security support for that version of Python ends. For example, Python 3.9 security support ends in October 2025 and Django 4.2 LTS security support ends in April 2026. Therefore Django 4.2 is the last version to support Python 3.9.
What are Django’s prerequisites?
Django requires Python. See the table in the next question for the versions of Python that work with each version of Django. Other Python libraries may be required for some use cases, but you’ll receive an error about them as they’re needed.
For a development environment – if you just want to experiment with Django – you don’t need to have a separate web server installed or database server.
Django comes with its own lightweight development server. For a production environment, Django follows the WSGI spec, PEP 3333, which means it can run on a variety of web servers. See Deploying Django for more information.
Django runs SQLite by default, which is included in Python installations. For a production environment, we recommend PostgreSQL; but we also officially support MariaDB, MySQL, SQLite, and Oracle. See Supported Databases for more information.
Basic
Django 3 core parts
Django’s Parts
Django is built on three core parts:
- A mapper between URLs and view code
- An abstraction for interacting with a database
- A templating system to manage your HTML like code
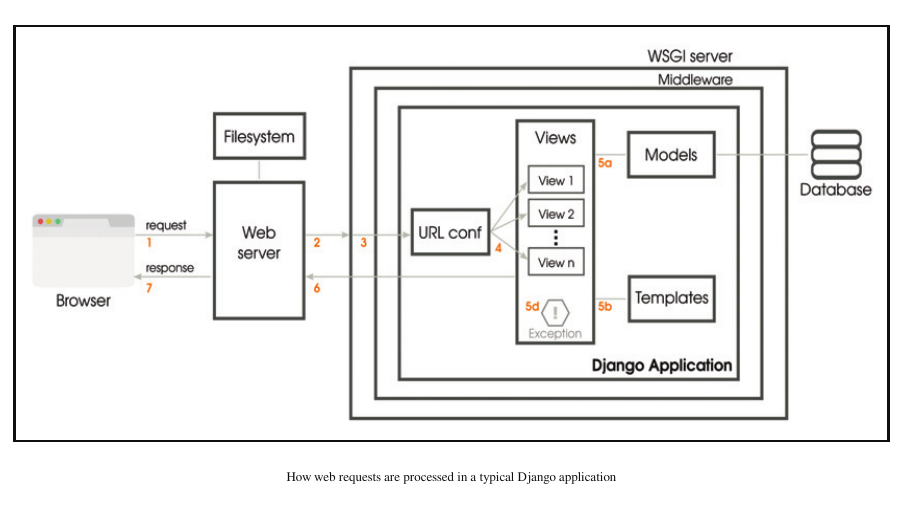
Big Picture
A Django View is Not a Controller
Check out Figure 3-1 on the next page, does it look familiar?
This is one of my diagrams, but there are plenty of similar versions out there. A common way of explaining Django’s architecture in terms of MVC is to describe it as a Model-Template-View (MTV) or Model-View-Template (MVT).
There’s no difference between MTV and MVT—they’re two different ways to describe the same thing, which adds to the confusion.
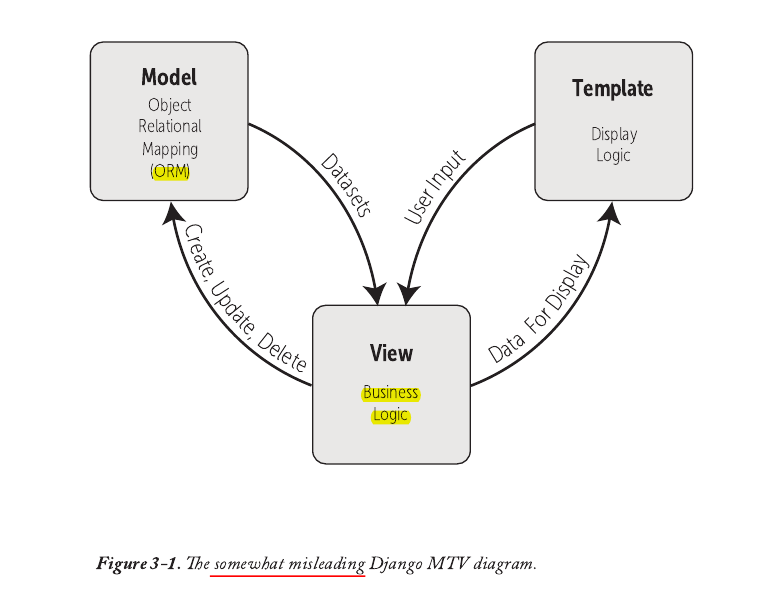
The misleading part of this diagram is the view. The view in Django is most often described as being equivalent to the controller in MVC, but it’s not—it’s still the view.
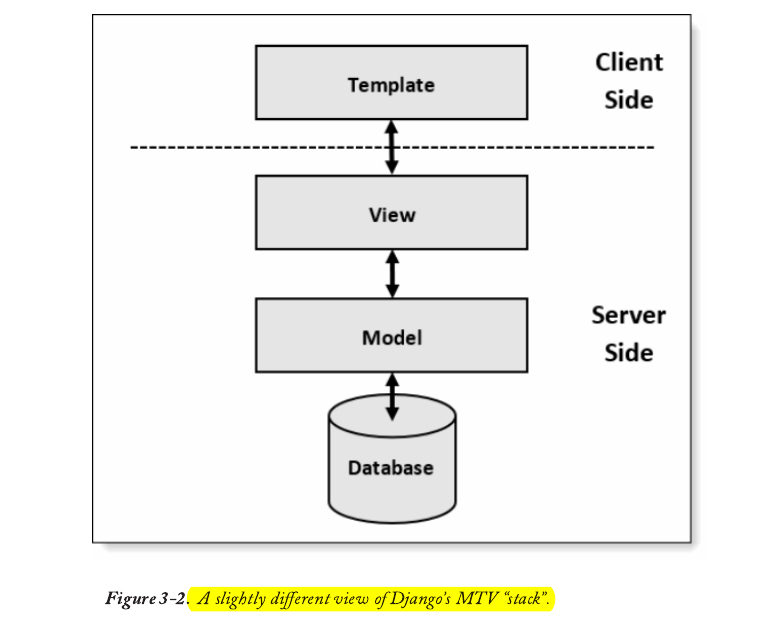
Note how I have drawn a line between the client- and server-side. Like all client/server architectures, Django uses request and response objects to communicate between the client and the server. As Django is a web framework, we’re talking about HTTP request and response objects.
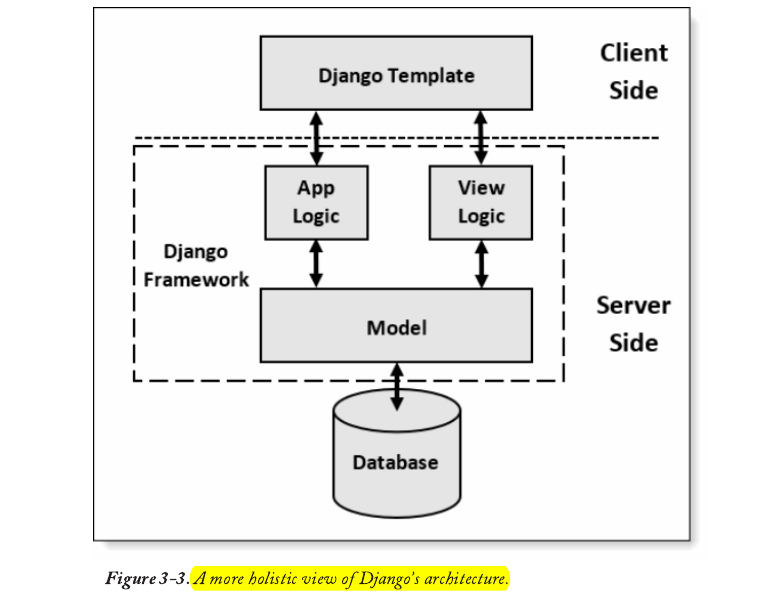
The next point to note is that the Django framework encapsulates the model, view logic and business logic.
In some tutorials, it’s said that the Django framework is the controller, but that isn’t true either—the Django framework can do much more than respond to user input and interact with data.
A perfect example of this extra power is Django’s middleware, which sits between the view and the client-side. Django’s middleware performs critical security and authentication checks before sending the response to the browser.
HTTP Request/Response Cycle
A network protocol is a set of rules for formatting and processing data. It's like a common language for computers that lets them talk to each other even if they are on opposite sides of the world and have very different hardware and software.
HTTP is a protocol that works with a client-server model of computing. When you go to a website, your computer, or "client," sends a "request," and a "server" sends back a "response." The client doesn't have to be a computer, though. It could be a cell phone or any other device that can connect to the internet. But the process is the same: a client sends an HTTP request to a URL, and the server sends an HTTP response back.
In the end, a web framework like Django takes HTTP requests to a given URL and sends back an HTTP response with the information needed to render a webpage. All done. Usually, this process involves finding the correct URL, connecting to a server, logic, styling with HTML, CSS, JavaScript, or static assets, and then sending the HTTP response.
This is what the abstract flow looks like:
HTTP Request -> URL -> Django combines database, logic, styling -> HTTP Response
Book: Python Flask and Django by emenwa global
Model-View-Controller (MVC) and Model-View-Template (MVT)
Model-View-Controller (MVC) and Model-View-Template (MVT)
The Model-View-Controller (MVC) sequence has become a popular way to split up an application's data, logic, and display into separate parts over time. This makes it easier for a programmer to figure out what the code means. The MVC pattern is used by many web frameworks, such as Ruby on Rails, Spring (Java), Laravel (PHP), ASP.NET (C#), and many others.
There are three main parts to the traditional MVC pattern:
- Model: Takes care of data and the primary project logic
- View: Gives the model's data in a specific format.
- Controller: Takes input from the user and does application-specific logic.
Django's method, often called Model-View-Template, only loosely follows the traditional MVC method (MVT). Developers who have worked with web frameworks before might find this confusing at first. In reality, Django's approach is a 4-part pattern that also includes URL Configuration. A better way to describe it would be something like MVTU.
Here's how the Django MVT pattern works:
- Model: Manages data and core business logic
- View: Tells the user what data is sent to them, but not how it is shown.
- Template: Shows the information in HTML, with CSS, JavaScript, and Static Assets as options.
- URL Configuration: Regular-expression components set up for a View
This interaction is a crucial part of Django, but it can be hard to understand for new users, so let's draw a diagram of how an HTTP request and response cycle works. When a URL like https://djangoproject.com is typed in, the first thing that happens in our Django project is that a URL pattern (contained in urls.py) that matches it is found. The URL pattern is linked to a single view (in views.py) that combines the data from the model (in models.py) and the styling from a template (any file ending in .html). After that, the view gives the user an HTTP response.
The flow looks like below:
HTTP Request -> URL -> View -> Model and Template -> HTTP Response
Book: Python Flask and Django by emenwa global
Concept
dir() vs help()
Koncept HolyGrail
dir() lists attributes and methods of an object, while help() provides detailed documentation about specific objects, including classes, functions, and modules.
Django
djangorestframeworkrest_framework
manage.py vs django-admin
manage.py shell vs django shell
python manage.py shell loads the Django project's environment, while django-admin shell provides a general Python shell without Django-specific setup.
Other Topic
Django Run Server
mutable & immutable objects
Mutability is a fundamental concept of the Python language and is broken down into mutable and immutable objects.
An object is said to be mutable if its values can change over time. If an object's value will not change, then that object is said to be immutable.
In Python, an object's mutability is also defined by the data type that it is. For example, mutable objects are represented using a list, dictionary, set, or QuerySet.
Immutable objects are defined by using the bool, decimal, float, int, range, string, and tuple data types. Queries will perform better if the object being searched is immutable rather than mutable.
Most of the time, the difference is miniscule, literally in nano-or milliseconds. When your project goes live and your database starts to collect thousands, if not millions, of records, the time it takes to query something will then be noticed when it takes seconds, if not minutes or tens of minutes, to complete a single query.
Becomming Enterprise Developer (pg-122)
how to master Django framework
To master the Django framework, it's essential to gain proficiency in several key areas. Here are some of the most important topics to learn:
1. Understanding Models:
Django's ORM (Object-Relational Mapping) allows you to interact with your database using Python objects. Learn how to define models to represent your application's data, work with relationships between models, and use Django's querysets for database operations.
2. Views and URLs:
Understand how views process HTTP requests and generate responses. Learn how to map URLs to views using URL patterns, and explore Django's function-based views and class-based views.
3. Templates and Template Language:
Django uses a powerful templating engine to generate dynamic HTML content. Learn how to create templates, use template inheritance and inclusion, and leverage Django's template language for data rendering and logic.
4. Forms:
Django provides tools for working with HTML forms and handling form submissions. Learn how to create forms using Django's form classes, validate user input, and process form submissions in views.
5. Authentication and Authorization:
Understand how to implement user authentication and authorization in Django. Learn about Django's built-in authentication system, including user authentication views, user models, and permissions.
6. Admin Interface:
Django includes a customizable admin interface for managing site content. Learn how to register models with the admin interface, customize admin views, and implement custom admin actions and filters.
7. Middleware:
Middleware components are a key part of Django's request/response processing pipeline. Learn how to write custom middleware to perform tasks such as request/response modification, authentication, or logging.
8. Class-Based Views (CBVs):
While Django supports function-based views, class-based views offer a more organized and reusable approach to view development. Mastering CBVs can help you create more modular and maintainable code.
9. RESTful APIs with Django REST Framework:
If your application needs to expose a RESTful API, learn how to use Django REST Framework (DRF) to build APIs quickly and efficiently. DRF provides tools for serialization, authentication, pagination, and more.
10. Testing:
Writing tests is crucial for ensuring the reliability and correctness of your Django applications. Learn how to write unit tests, integration tests, and functional tests using Django's testing framework.
11. Security Best Practices:
Understand common security vulnerabilities and best practices for securing Django applications. Topics include protecting against CSRF attacks, XSS attacks, SQL injection, and ensuring secure user authentication.
12. Deployment:
Learn how to deploy Django applications to production environments. Understand deployment options such as using WSGI servers like Gunicorn, configuring web servers like Nginx or Apache, and setting up databases and caching solutions.
By focusing on these key topics and building projects that utilize these concepts, you'll develop a strong foundation in Django development and be well-equipped to create robust and scalable web applications. Additionally, staying up-to-date with the latest developments in the Django ecosystem and exploring advanced topics as you gain experience will further enhance your mastery of the framework.
Basic of CBVs in Django
Certainly! Class-Based Views (CBVs) in Django provide a more structured and reusable way to handle HTTP requests compared to function-based views. Here's a comprehensive list of commonly used CBVs that you should learn:
1. View:
The base class for all views. It doesn't perform any actions itself but serves as the superclass for other views.
2. TemplateView:
Renders a template in response to a GET request. This is useful for rendering simple static pages or pages that don't require data manipulation.
3. RedirectView:
Redirects the user to a different URL. It's useful for implementing redirects in response to specific conditions or actions.
4. ListView:
Renders a list of objects from a queryset. It's often used to display a list of items from a database table or any other iterable data source.
5. DetailView:
Renders a detail page for a single object retrieved from a queryset. It's used to display detailed information about a specific object, typically identified by a unique identifier such as a primary key.
6. CreateView:
Handles the creation of new objects. It renders a form for creating a new object and processes the submitted data.
7. UpdateView:
Handles the updating of existing objects. It renders a form pre-filled with the data of an existing object and processes the submitted data to update the object.
8. DeleteView:
Handles the deletion of existing objects. It renders a confirmation page before deleting the object and then performs the deletion upon confirmation.
9. FormView:
Renders a form and handles its submission. It's useful for scenarios where you need custom logic for form processing.
10. DetailView:
Renders a detail page for a single object retrieved from a queryset. It's used to display detailed information about a specific object, typically identified by a unique identifier such as a primary key.
11. ArchiveIndexView:
Renders a list of objects grouped by date. It's useful for displaying archives of objects, such as blog posts grouped by publication date.
12. YearArchiveView:
Renders a list of objects for a specific year. It's typically used in conjunction with ArchiveIndexView to navigate through archives by year.
13. MonthArchiveView:
Renders a list of objects for a specific month within a year. It's used to display archives filtered by month.
14. DayArchiveView:
Renders a list of objects for a specific day within a month and year. It's used to display archives filtered by day.
15. TodayArchiveView:
Renders a list of objects for the current day. It's a shortcut for DayArchiveView with today's date.
16. DateDetailView:
Renders a detail page for a single object for a specific date. It's useful for displaying detailed information about an object based on its date.
These are the core CBVs provided by Django. Mastering these classes will enable you to efficiently handle common web development tasks and build robust applications using Django's class-based views architecture.
Mastering CBVs in Django
Mastering Class-Based Views (CBVs) in Django requires a combination of understanding the underlying concepts and practical application. Here's a structured approach to mastering CBVs:
1. Understand the Basics:
- Familiarize yourself with the different types of CBVs provided by Django, such as ListView, DetailView, CreateView, UpdateView, DeleteView, etc.
- Read the Django documentation thoroughly to understand the purpose and usage of each CBV.
- Review the source code of Django's built-in CBVs to gain insights into how they are implemented.
2. Hands-on Practice:
- Start by creating simple projects or applications where you can apply CBVs.
- Implement basic functionalities such as displaying lists of objects, viewing details, creating, updating, and deleting objects using CBVs.
- Experiment with different CBVs and observe how they behave in different scenarios.
- Refactor existing function-based views to class-based views to understand the differences and benefits.
3. Explore Customization:
- Dive deeper into customization options provided by CBVs. Learn how to override methods and attributes to tailor the behavior of CBVs to your specific requirements.
- Practice extending built-in CBVs to add additional functionality or modify existing behavior without rewriting the entire view.
4. Advanced Topics:
- Explore more advanced topics related to CBVs, such as mixin classes, multiple inheritance, and view composition.
- Learn about best practices for structuring CBVs in large-scale applications to maintain code readability and reusability.
- Experiment with integrating third-party libraries or frameworks with CBVs, such as Django REST Framework for building RESTful APIs.
5. Review and Refine:
- Regularly review your code and seek feedback from peers or mentors to identify areas for improvement.
- Refactor your codebase to incorporate best practices and design patterns related to CBVs.
- Stay updated with the latest developments in the Django ecosystem, including new features and improvements related to CBVs.
6. Build Real Projects:
- Work on real-world projects that require complex functionality and utilize CBVs extensively.
- Apply your knowledge of CBVs to solve practical problems and implement features efficiently.
-
Reflect on your project experiences and identify lessons learned to improve your understanding and mastery of CBVs.
-
Contribute to Open Source:
-
Consider contributing to open-source projects that use CBVs. This allows you to collaborate with experienced developers, gain exposure to different coding styles, and contribute to the Django community.
By following this structured approach and combining theoretical understanding with practical application, you can gradually master Class-Based Views in Django and become proficient in building robust web applications. Remember that mastery comes with continuous learning, practice, and experimentation.
Example of Class-Based View (CBV) in Django:
Let's consider a scenario where you want to display a list of books using a ListView. First, you'll define a model for the books in your models.py:
Then, you'll create a ListView to display a list of books in your views.py:
# views.py

from django.views.generic import ListView
from .models import Book

class BookListView(ListView):
    model = Book
    template_name = 'book_list.html'  # specify the template name
    context_object_name = 'books'     # specify the context variable name for the list of objects
    ordering = ['-publication_date']  # specify the default ordering of the queryset
Next, you'll create a template to render the list of books. Create a file named book_list.html in your templates directory:
<!-- book_list.html -->

<!DOCTYPE html>
<html>
<head>
    <title>Book List</title>
</head>
<body>
    <h1>Book List</h1>
    <ul>
        {% for book in books %}
            <li>{{ book.title }} - {{ book.author }} ({{ book.publication_date }})</li>
        {% empty %}
            <li>No books available.</li>
        {% endfor %}
    </ul>
</body>
</html>
Finally, you'll set up the URL mapping in your urls.py to associate the ListView with a URL:
# urls.py

from django.urls import path
from .views import BookListView

urlpatterns = [
    path('books/', BookListView.as_view(), name='book-list'),
]
Now, when a user navigates to /books/ in the browser, Django will use the BookListView to fetch the list of books from the database and render them using the book_list.html template.
is the context_object_name random variable name or ?
No, context_object_name is not a random variable name. It's a specific attribute of Django's ListView class-based view (CBV) that allows you to specify the name of the variable that will be used to pass the list of objects to the template context.
When you define a ListView in Django, it automatically retrieves a list of objects from the specified model and passes them to the template context. By default, this list is passed using the variable name object_list. However, you can customize this variable name using the context_object_name attribute.
For example, in the following code snippet:
class BookListView(ListView):
    model = Book
    template_name = 'book_list.html'
    context_object_name = 'books'
The context_object_name is set to 'books', which means that in the book_list.html template, the list of books will be available as the variable books.
So, in the template:
Here, books is the name specified by context_object_name, and it represents the list of books retrieved by the ListView. You can choose any meaningful name for context_object_name based on your application's context.
This is just one example of how you can use a CBV in Django. CBVs provide a flexible and reusable way to handle different types of views in your web application, allowing you to write clean and maintainable code.
Question about CBVs in django
In Django's Class-Based Views (CBVs), the as_view() method is a crucial part of the view setup process. It's used to convert a class-based view into a view function that Django can use to handle HTTP requests.
When you define a CBV, you're essentially defining a Python class that encapsulates the logic for processing a particular type of HTTP request. However, Django's URL routing system expects to work with functions rather than classes. So, to make your CBV compatible with Django's URL routing mechanism, you use the as_view() method.
Here's how it works:
1. Defining the CBV:
First, you define your CBV by creating a subclass of one of Django's built-in CBV classes, such as ListView, DetailView, CreateView, etc. For example:
from django.views.generic import ListView
from .models import MyModel

class MyListView(ListView):
    model = MyModel
    template_name = 'myapp/my_model_list.html'
2. Using as_view() in URL Configuration:
When you include your CBV in your URL configuration (usually in urls.py), you use the as_view() method to convert the CBV into a view function that Django's URL dispatcher can work with. For example:
from django.urls import path
from .views import MyListView

urlpatterns = [
    path('my-list/', MyListView.as_view(), name='my-list'),
]
3. Instantiating the CBV:
When Django's URL dispatcher matches a URL pattern to a view function, it will instantiate the CBV using the as_view() method and call the appropriate method (such as get() or post()) to handle the HTTP request.
Behind the scenes, the as_view() method creates a function that:
- Instantiates the CBV class.
- Calls the appropriate method (dispatch()) on the instance to handle the HTTP request.
- Returns the HTTP response generated by the CBV.
This process allows Django's URL routing system to seamlessly work with CBVs, providing a more object-oriented and modular approach to handling HTTP requests compared to traditional function-based views.
Detail on routers
In traditional Django applications that serve HTML content using Django's built-in views and templates, routers are not typically used. Routers are primarily associated with Django REST Framework (DRF), which is an additional library used for building RESTful APIs in Django.
In traditional Django applications:
1. URL Configuration:
URL patterns are typically defined in the urls.py module of your Django application. You manually specify the URL patterns and map them to corresponding views or view functions.
2. Views:
Views in traditional Django applications are typically implemented as functions or class-based views (CBVs) within your Django application. These views are responsible for processing HTTP requests and returning HTTP responses, usually in the form of HTML content generated with Django's template engine.
3. Templates:
HTML templates are used to generate the content that is returned to the user's browser. Django's template engine allows you to define dynamic HTML content by embedding Python-like code within HTML templates.
In summary, if you are building a traditional Django application that serves HTML content, you won't typically use routers. Routers are specifically designed for building RESTful APIs with Django REST Framework, where URL routing and resource management are different from traditional Django applications.
However, if you are building a RESTful API using Django REST Framework, routers provide a convenient and efficient way to define URL patterns for your API endpoints, organize your API resources, and manage URL configurations.
Others
pip freeze
If you want to freeze a newly installed package only to your prod-requirements.txt file and not the dev-requirements.txt, you can manually add it to prod-requirements.txt after installation. Here's how you can do it:
-
First, install the package using pip install
<package_name>. -
After installation, run pip freeze to see the list of installed packages.
-
Identify the newly installed package in the output of pip freeze.
-
Copy the line corresponding to the newly installed package, including its version, from the output of pip freeze.
-
Open your
prod-requirements.txtfile in a text editor. -
Paste the copied line into your
prod-requirements.txtfile. -
Save the
prod-requirements.txtfile.
By following these steps, you're ensuring that the newly installed package is frozen only in your prod-requirements.txt file and not in your dev-requirements.txt file. This keeps the development and production environments separate and ensures that only production dependencies are specified in the prod-requirements.txt.
Paginator
-
list view vs tempate view
Warning
ask chatgpt:
how does the seniort programmer writes this code:
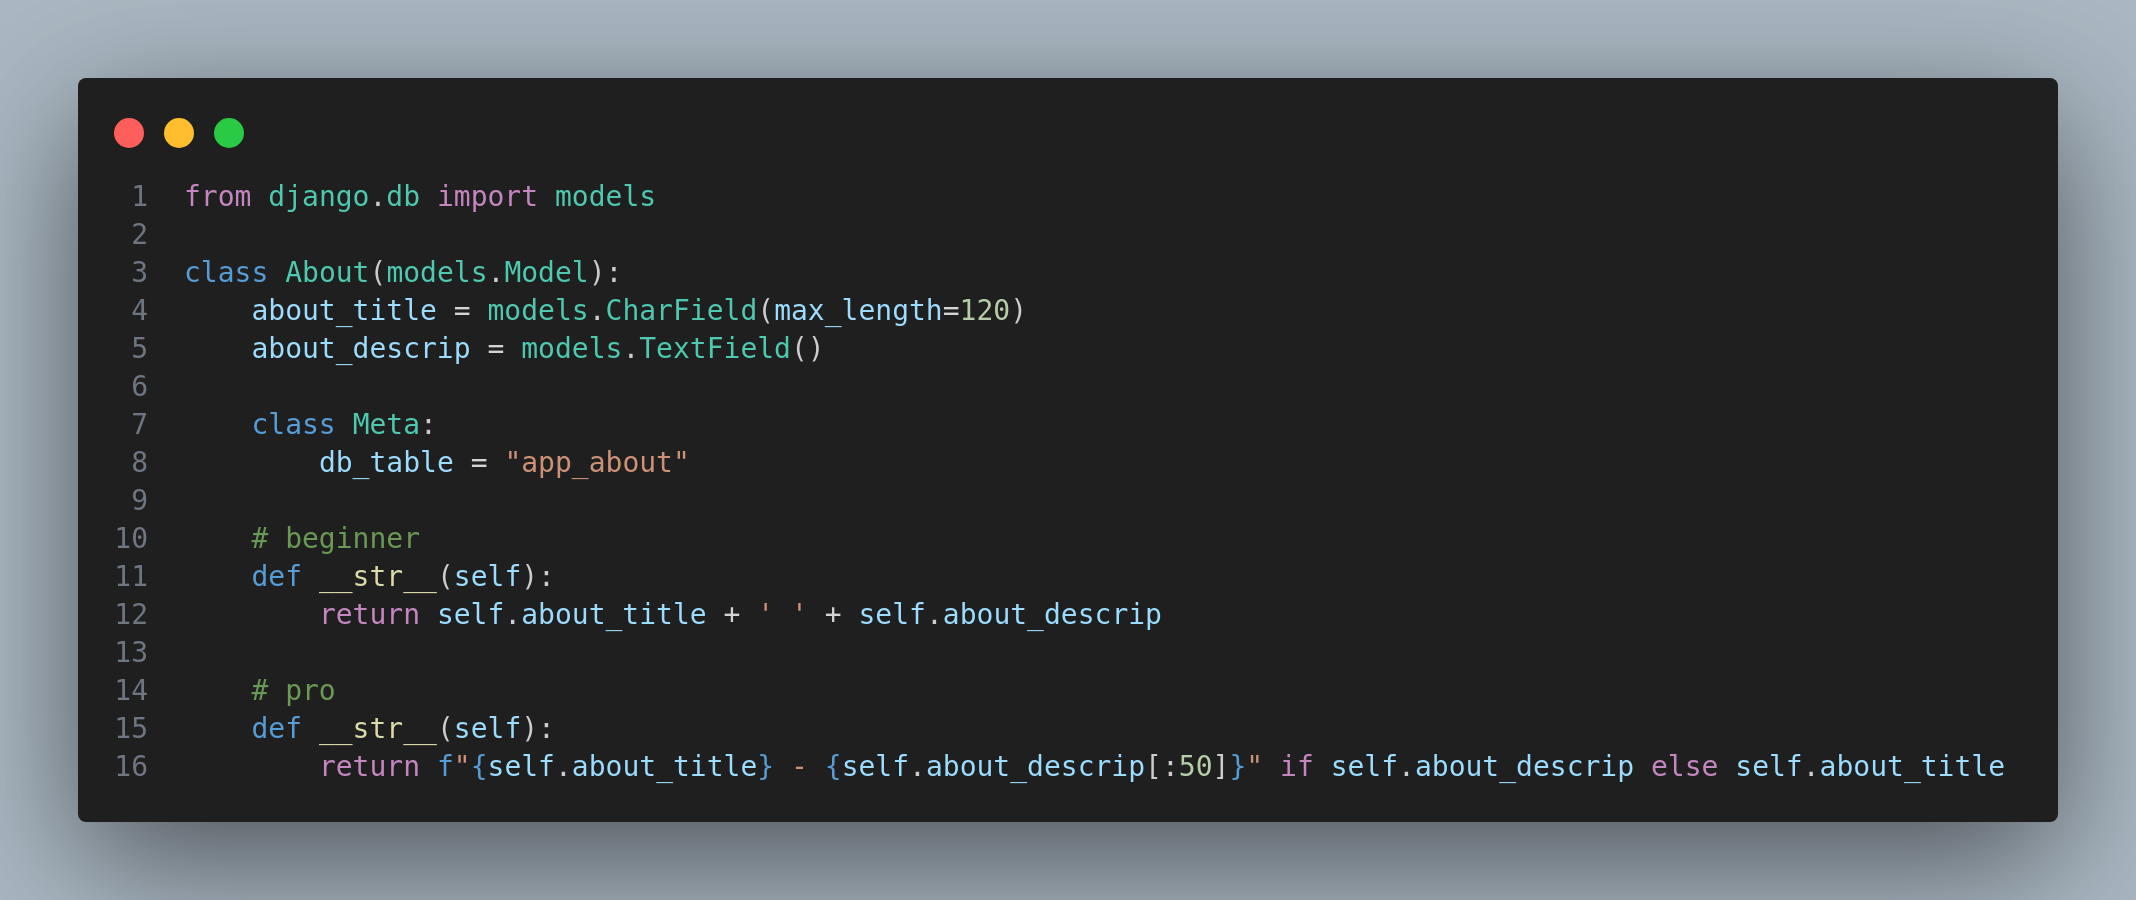
Defensive String Representation for About Model
A senior programmer might write the __str__ method in a slightly more defensive and robust way.
Here's an example of how they might do it(shown in fig-1):
In this version, a few improvements have been made:
-
Conditional Concatenation: It checks if about_descrip is not empty before concatenating it with about_title. If
about_descripis empty, it simply returnsabout_title. This avoids potential errors ifabout_descripis None or an empty string. -
Limiting Description Length: It limits the length of about_descrip to the first 50 characters. This helps to prevent excessively long strings from cluttering up output (you can adjust this number to fit your needs).
-
Formatted String: It uses an f-string for string interpolation, which is more concise and readable.
By incorporating these practices, the code becomes more robust and easier to understand and maintain.
How to view all app code in index.html
@admin.register(About)
class AboutAdmin(admin.ModelAdmin):
    list_display = ['title', 'description', 'image_preview']

    def image_preview(self, obj):
        if obj.image:
            return mark_safe('<img src="{url}" width="100" height="100" />'.format(url=obj.image.url))
        else:
            return 'No Image'

    image_preview.short_description = 'Image Preview'
from django.views.generic import TemplateView
from .models import About, Contact

class IndexView(TemplateView):
    template_name = 'index.html'

    def get_context_data(self, **kwargs):
        context = super().get_context_data(**kwargs)
        context['about'] = About.objects.first()  # Assuming you have only one About instance
        context['contact'] = Contact.objects.first()  # Assuming you have only one Contact instance
        return context
Example
To add a nullable image field in Django, you can use the ImageField from django.db.models. By default, ImageField allows null values, so you just need to set null=True and blank=True attributes. Here's how you can do it:
1. First, ensure you have Pillow installed. Pillow is a required dependency for handling images in Django.
2. In your Django model, define an ImageField and set null=True and blank=True attributes.
django nullable field
In Django models, null=True and blank=True are two parameters that can be set for a field to allow it to be optional.
1. null=True: This parameter specifies that the database column associated with the field can store NULL values. It's a database-level option. If null=True is set, Django will store empty values as NULL in the database.
2. blank=True: This parameter is used for form validation. When blank=True is set, the field is allowed to be left blank in forms. It's a validation-related option. Without blank=True, the field would be required in forms.
Here's a breakdown of their roles:
- null=True: Affects database schema, allowing NULL values in the database column.
- blank=True: Affects form validation, allowing the field to be left blank in forms.
Using null=True, blank=True together is common when you want a field to be optional both at the database level and in forms. For example, in the context of an image field, null=True allows the database to store records without images, and blank=True allows users to submit forms without uploading an image.
Reuse HasAddPermissionMixin in Django Admin for Blogs App
Yes, you can reuse the HasAddPermissionMixin class in your blogs app's admin.py file, provided that you have access to it. You can either import it directly or place it in a module that both apps can access.
Here's how you can reuse the HasAddPermissionMixin class in your blogs app's admin.py file:
from django.contrib import admin
from .models import YourModel
from websites.apps.admin import HasAddPermissionMixin

class YourModelAdmin(HasAddPermissionMixin, admin.ModelAdmin):
    pass  # Add other admin customization as needed

admin.site.register(YourModel, YourModelAdmin)
In the above code, replace YourModel with the model you want to apply this mixin to. This will apply the HasAddPermissionMixin to your model admin, allowing you to control the add permission based on the existence of objects.
Make sure that the websites.apps.admin module is importable from your blogs app. If it's not directly accessible, you may need to reorganize your code or import the mixin from a different location that both apps can access.
chatgpt
Static Category
To create a category dropdown field in a Django model, you typically use the models.CharField with choices. Here's how you can do it:
from django.db import models

class YourModel(models.Model):
    CATEGORY_CHOICES = (
        ('option1', 'Option 1'),
        ('option2', 'Option 2'),
        ('option3', 'Option 3'),
        # Add more choices as needed
    )

    category = models.CharField(max_length=50, choices=CATEGORY_CHOICES)

    # Your other fields here
Dynamic Category
To create a dynamic dropdown menu where the admin can add new categories through the Django admin interface, you can utilize Django's built-in ForeignKey field or ManyToManyField if you want multiple categories per item. Here's how you can do it using ForeignKey:
-
Create a Category Model: First, create a model to represent your categories.
-
Register Models in admin.py: Register both models in your admin.py file to make them accessible in the Django admin interface.
mark_safe
Pillow
Pillow is a Python Imaging Library (PIL) fork that provides extensive capabilities for opening, manipulating, and saving many different image file formats. It is a powerful library for image processing tasks in Python and is widely used in various applications, including web development, scientific computing, computer vision, and more.
In Django, Pillow is commonly used for handling image-related tasks such as uploading, processing, and serving images in web applications. Here's how Pillow is typically used in Django:
-
ImageFieldin Models:Django's ImageField is used to store image files in the database. Pillow integrates seamlessly with ImageField, allowing you to handle image uploads and save them to the filesystem.
Django Built-in
Django accounts
Django accounts typically refers to the user authentication system built using Django, a high-level Python web framework. In web development, user authentication is a common requirement where users need to register, log in, log out, and manage their accounts.
Django provides a built-in authentication system that includes features such as user registration, login, logout, password management, and more. This system is highly customizable and can be extended to meet the specific requirements of different projects.
When developers refer to "Django accounts," they are often discussing the implementation and customization of these authentication features within a Django web application. This can include designing user registration forms, login views, password reset functionality, user profile pages, and other related features.
Django accounts are an essential component of many web applications, as they allow users to securely access and interact with the application's features and data. By using Django's built-in authentication system, developers can streamline the development process and ensure that user accounts are managed securely and efficiently.
Certainly! Below, I'll guide you through the process of setting up a basic Django project with user authentication. This will include creating a new Django project, setting up user authentication, and creating basic views and templates for user registration, login, and logout.
Install Django: If you haven't already installed Django, you can do so using pip, Python's package manager:
pip install django

# Create a new Django project:
django-admin startproject myproject

# Navigate to the project directory:
cd myproject

# Django's built-in authentication system is part of the django.contrib.auth module

# Create a new Django app for user authentication:
python manage.py startapp accounts
Create URL patterns: Define URL patterns for user authentication views in your project's urls.py file:
from django.contrib import admin
from django.urls import path, include

urlpatterns = [
    path('admin/', admin.site.urls),
    path('accounts/', include('accounts.urls')),
]
Create URL patterns in accounts app: Create a new file called urls.py in the accounts app directory, and define URL patterns for authentication views:
from django.urls import path
from . import views

urlpatterns = [
    path('signup/', views.signup, name='signup'),
    path('login/', views.login, name='login'),
    path('logout/', views.logout, name='logout'),
]
Create views: Create view functions for user registration, login, and logout in the views.py file inside the accounts app:
from django.shortcuts import render

def signup(request):
    # Implement user registration logic here
    return render(request, 'accounts/signup.html')

def login(request):
    # Implement login logic here
    return render(request, 'accounts/login.html')

def logout(request):
    # Implement logout logic here
    return render(request, 'accounts/logout.html')
Create templates: Create HTML templates for user registration, login, and logout inside a templates/accounts directory in your app. Name these templates signup.html, login.html, and logout.html, respectively. You can design these templates as per your project's requirements.
# Migrate the database:
python manage.py migrate

# Run the development server:
python manage.py runserver
Now, you should be able to access the user authentication views at URLs like /accounts/signup/, /accounts/login/, and /accounts/logout/. You can customize the views, templates, and functionality further based on your project's requirements. Additionally, you may want to implement features like password reset, user profile management, etc., as needed.
myproject/
├── accounts/
│   ├── templates/
│   │   ├── accounts/
│   │   │   ├── signup.html
│   │   │   ├── login.html
│   │   │   └── logout.html
│   ├── views.py
│   ├── urls.py
├── myproject/
│   ├── settings.py
│   ├── urls.py
│   └── ...
└── ...
Efficient Data Presentation in Django Templates: Integrating Multiple Models into Your Index Page
To display the data from the models About, Project, ProjectCategory, ProjectItem, Service, and ServiceItem in your index.html template, you'll need to pass the data from these models to the template through your view function or class-based view.
Here's how you can modify your view to include data from all these models:
from django.shortcuts import render
from django.views.generic import TemplateView
from .models import About, Project, ProjectCategory, ProjectItem, Service, ServiceItem

class IndexView(TemplateView):
    template_name = 'index.html'

    def get_context_data(self, **kwargs):
        context = super().get_context_data(**kwargs)

        # Retrieve the About instance
        about_info = About.objects.first()
        context['about_info'] = about_info

        # Retrieve all projects
        projects = Project.objects.all()
        context['projects'] = projects

        # Retrieve all project categories
        project_categories = ProjectCategory.objects.all()
        context['project_categories'] = project_categories

        # Retrieve all service items
        service_items = ServiceItem.objects.all()
        context['service_items'] = service_items

        return context
<!DOCTYPE html>
<html lang="en">
<head>
    <meta charset="UTF-8">
    <meta name="viewport" content="width=device-width, initial-scale=1.0">
    <title>Index</title>
</head>
<body>
    <h1>About</h1>
    <p>{{ about_info.title }}</p>
    <p>{{ about_info.description }}</p>

    <h1>Projects</h1>
    <ul>
        {% for project in projects %}
            <li>
                <h2>{{ project.title }}</h2>
                <p>{{ project.description }}</p>
            </li>
        {% endfor %}
    </ul>

    <h1>Project Categories</h1>
    <ul>
        {% for category in project_categories %}
            <li>{{ category.name }}</li>
            <ul>
                {% for item in category.items.all %}
                    <li>{{ item.title }}</li>
                    <p>{{ item.description }}</p>
                {% endfor %}
            </ul>
        {% endfor %}
    </ul>

    <h1>Service Items</h1>
    <ul>
        {% for item in service_items %}
            <li>
                <h2>{{ item.title }}</h2>
                <p>{{ item.description }}</p>
            </li>
        {% endfor %}
    </ul>
</body>
</html>
In Django, the context variable is a dictionary that is passed from the view to the template. It contains data that you want to make available to your template for rendering.
In the provided code snippet:
- Project.objects.all() retrieves all instances of the Project model from the database.
- projects is a queryset containing all instances of the Project model.
- context['projects'] = projects assigns the queryset projects to the key 'projects' in the context dictionary.
The context dictionary is then passed to the template when rendering the view. This allows you to access the data in the template using the keys of the context dictionary. For example, in your template, you would use {{ projects }} to access the list of projects retrieved from the database.
Understanding Queryset Retrieval in Django's Model Views: all() vs first() and Looping in Templates
The difference between Project.objects.all() and Project.objects.first() lies in the data they retrieve from the database:
1. Project.objects.all(): This retrieves all instances of the Project model from the database. It returns a queryset, which is a list-like object containing all the instances.
2. Project.objects.first(): This retrieves the first instance of the Project model from the database. It returns a single instance of the model, not a queryset.
So, when you use Project.objects.all(), you get all instances of the Project model, and when you use Project.objects.first(), you get only the first instance.
In the context of your IndexView class-based view, if you want to display all projects, you would typically use Project.objects.all() and iterate over them in your template using a loop. For example:
Then in your template, you would loop through projects to display each project:
On the other hand, if you only need to display information about a single project (for instance, the first project), you could use Project.objects.first():
# Retrieve the first project
first_project = Project.objects.first()
context['first_project'] = first_project
And then in your template, you would display information about this single project:
So, to summarize:
- Use
Project.objects.all()when you want to retrieve and display all instances of the Project model. - Use
Project.objects.first()when you only need to retrieve and display information about the first instance of the Project model. - If you use
Project.objects.all(), you typically need to loop through the queryset in your template to display each project.
Reference
Note
-
Django in Action MEAP V01 by Christopher Trudeau - Manning publication
-
Django Popular Apps
- Django Packages
- 10 Django Packages Every Developer Must Know
- The 15 Best Django Packages for Your Application
- Top 12 Django Packages and Libraries